McAfee Management for Optimised Virtual Environments (MOVE) is an anti-virus solution that removes the need for an individual agent install on every guest virtual machine, providing performance benefits and administrative savings at the same time as full anti-virus and malware protection.
MOVE Agentless AntiVirus safeguards virtualised environments using advanced malware protection; integrating real-time threat intelligence with security management whilst offloading all on-access scanning to a dedicated service virtual machine. The agentless solution integrates with NSX Manager and Service Composer for policy and event handling, meaning virtual machines are protected as soon as they are provisioned.
This post will detail the installation and configuration process of the McAfee MOVE service deployment and the associate VMware components; NSX Manager and Guest Introspection. You should already have an ePO server and vCenter server in place.
Architecture
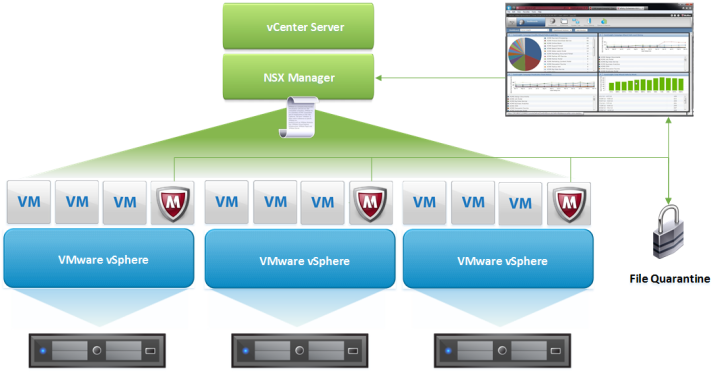
NSX Manager is deployed and registered with vCenter Server on a 1:1 mapping. Upon registration a plug-in is injected into the vSphere web client to enable deployment and management of logical networks and services.
Service deployments consisting of the Guest Introspection and McAfee MOVE ESX Agents are deployed to vSphere clusters; when a host is added to the cluster the configured services are automatically deployed. The McAfee Service Virtual Appliance (SVA) relies on VirusScan Enterprise for Linux for protection and updates, and utilises Global Threat Intelligence (GTI) for real time malware defense.
NSX Manager integrates with McAfee ePolicy Orchestrator to export profile configurations to be used when creating security profiles with Service Composer. Policies are applied to objects such as clusters belonging to an NSX security group, this ensures all virtual machines and hosts are instantly protected. The McAfee ePO integration also allows for management of Service Virtual Machines and reports.
Versions
We will be installing NSX Manager 6.2.4 with McAfee MOVE Agentless 3.6.1 (advanced license), on vCenter 6.0 and ESXi 6.0, version 5.5 of both can also be used. The ePO version should be 4.6.8, 5.1.0, 5.1.1 or 5.3.0. If you are using different versions check the McAfee MOVE compatibility matrix. There is a multi-platform version of McAfee MOVE compatible with Microsoft and Citrix hypervisors, which is beyond the scope of this guide.
With regards to deploying McAfee MOVE in a vCloud Networking and Security (vCNS) environment, using vShield Manager and Endpoint, these products are now end of life. The replacement solution is NSX Manager with Guest Introspection. For assistance with upgrading vShield Manager review Upgrading vShield Manager to NSX Manager.
New post: McAfee MOVE 4.5.0 Upgrade Guide with NSX
Requirements
- The NSX Manager appliance (1 per vCenter) is preconfigured with 16 GB RAM, 4 vCPU and 60 GB disk. VMware recommend a memory reservation for NSX Manager in production environments.
- The Guest Introspection agent (1 per host) is preconfigured with 1 GB RAM, 2 vCPU and 5 GB disk.
- The McAfee MOVE agent (1 per host) is preconfigured with 2 GB RAM, 2 vCPU and 15 GB disk.
- Each ESX Agent you deploy requires an IP address; 2 per host. This should be planned into the solution design as you will need to assign IP addresses using either DHCP or an IP pool of reserved addresses.
- A vSphere Distributed Switch (vDS) must be used, there is a work around for this by configuring the Agent VM Setting on each host, however this should be used for environments such as ROBO and not datacentres.
- ESXi servers must be grouped into clusters, even if only a single ESXi host resides in a cluster.
- Connectivity between the NSX Manager and vCenter \ ESXi management networks is required. If you have any firewalls in place review the NSX network port requirements.
- Environmental variables: correct DNS configuration, time synchronisation, and vSphere administrator access.
- VMware Tools must be installed on the guest virtual machines as this includes the Guest Introspection driver necessary for offloading on-access scanning.
- The McAfee MOVE licensing model is as follows: product trial for use with up to 10 hypervisors in a non-production environment, basic license for manual deployment of the Security Virtual Appliance (SVA) bought as a standalone product, advanced license for McAfee ePO based SVA deployment (packaged with Server Security Suite Essentials, Advanced, and Desktop).
- NSX Manager has a number of licensing models, the default license with NSX Manager v6.2.4 and later includes use of Guest Introspection for offloaded AV. For additional features compare NSX versions.
- If you have licensing queries check with McAfee support and your VMware account manager.
This guide is intended as a consolidation of the end to end process, before beginning any implementation you should review further documentation including the MOVE AV Agentless Product Guide and the VMware NSX 6.2 Documentation Centre.
Installation Part 1 – NSX Manager
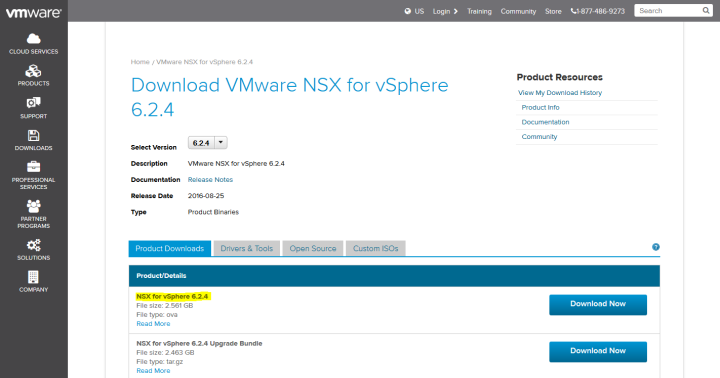
Download the NSX Manager OVA file from the Download VMware NSX for vSphere page.
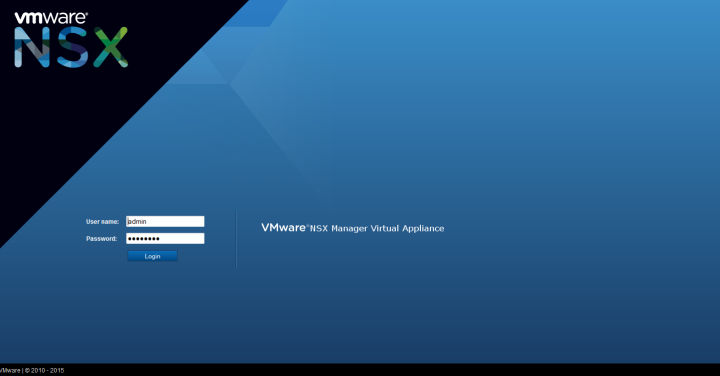
Deploy the OVA file to your vCenter server, in the customisation options configure the appliance network settings. Once the NSX Manager appliance is deployed and powered on open a web browser to the specified IP address, log in with the admin account, if you didn’t change the password during deployment the default password is default.
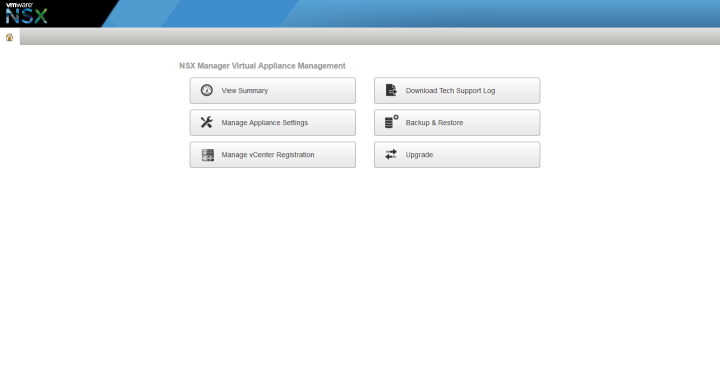
Click Manage vCenter Registration, under vCenter Server click Edit. Enter the name of the vCenter server to register NSX Manager and the relevant credentials, click Ok. It is good practise to set the time settings and host name in the Manage Appliance Settings page, you can also configure a syslog server, backups, change network settings, etc.
After configuring NSX Manager restart the VMware vSphere Web Client on the vCenter Server the NSX Manager was registered with. You may also need to restart your browser. Log in to the vSphere web client and browse to Networking & Security, click NSX Managers and verify the newly deployed NSX Manager is present.
To configure additional permissions select the NSX Manager and click Manage, Users. Here you can add, edit, and remove users and permissions. Each role provides a description of the level of access, for more information on NSX permissions click here. To add Active Directory permissions to NSX Manager select the Domains tab, and click the green plus symbol to add the LDAP details.
If you have a license key to apply to NSX Manager you can do so under the Administration option from the home page of the vSphere web client, select Licenses, Assets, Solutions, NSX.
Part 2 – McAfee ePO
Depending on your environment some of the steps below might already be configured, you may also need to repeat sections for multiple vCenters. Download the MOVE AntiVirus Agentless zip package, the MOVE AntiVirus Agentless extension for McAfee ePO, and the Data Center Connector for vSphere from McAfee downloads.
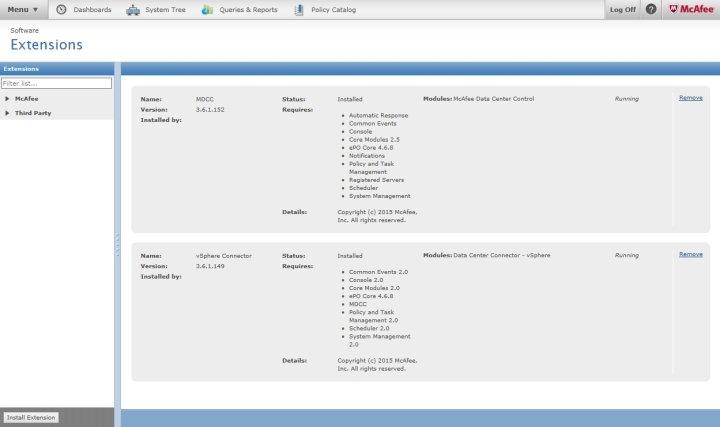
Log in to McAfee ePO as an administrator and browse to Menu, Software, Extensions. Click Install Extension and install the MOVE AntiVirus Agentless extension and the Data Center Connector for vSphere extension.
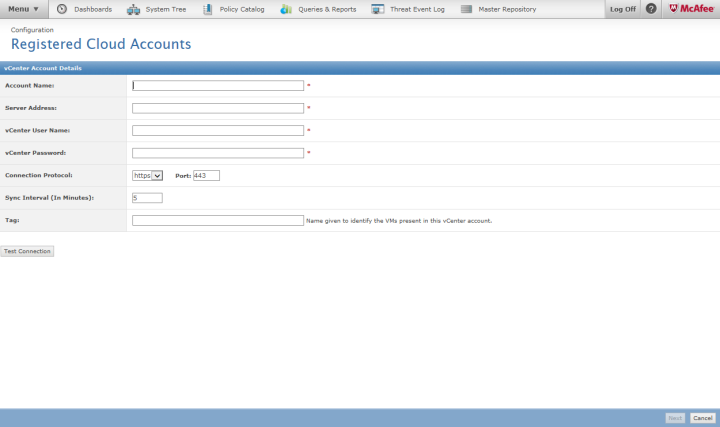
Next we need to register the vCenter, browse to Menu, Configuration, Registered Cloud Accounts. Click Actions, Add Cloud Account. Ensure VMware vSphere is selected and input the vCenter details.
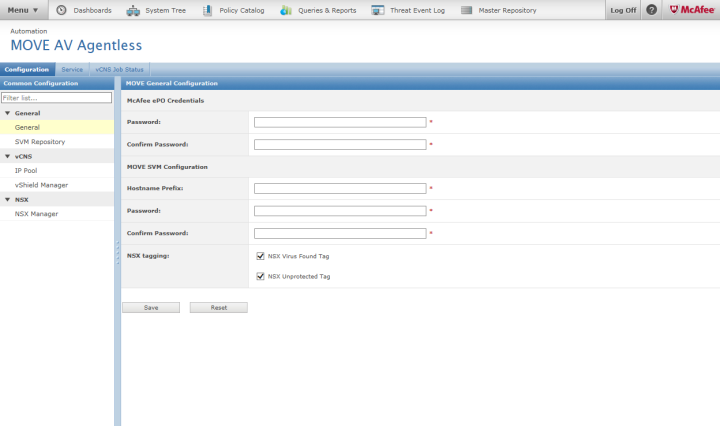
Before deploying MOVE we create a common configuration on the ePO server for use with each Service Virtual Machine (SVM). Browse to Menu, Automation, MOVE AV Agentless. On the Configuration tab select General, enter your administrative password and configure a naming convention and admin password for use with each SVM.
Next we can check in the SVM zip package downloaded earlier, browse to Menu, Automation, MOVE AV Agentless. From the Configuration tab select SVM repository and Actions, Add SVM.

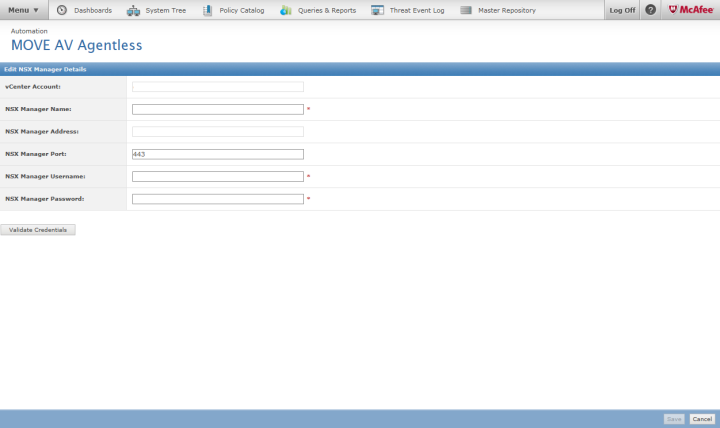
The extensions we installed will automatically detect NSX Manager instances, however we still need to register these with McAfee ePO. Click Menu, Automation, MOVE AV Agentless. From the Configuration tab select NSX Manager, the discovered instances of NSX Manager will be listed, click Edit. Fill in the NSX Manager details, validate the credentials can connect, and click Save.
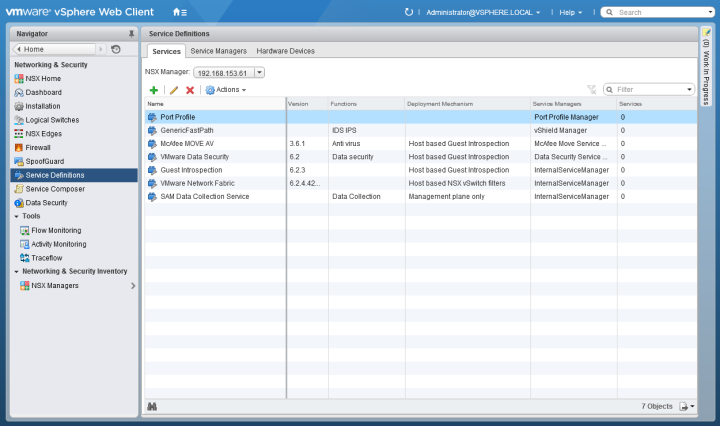
Next we register the MOVE Anti Virus service with McAfee ePO, browse to Menu, Automation, MOVE AV Agentless. Select the Service tab and click NSX Manager, the registered vCenters and associated NSX Managers will be listed, click Register. The McAfee MOVE AV service should now be listed in the vSphere web client under Networking & Security, Service Definitions. Once McAfee MOVE is defined as a service definition in vSphere, any scan policies are exported from McAfee ePO to NSX in real time.
Part 3 – Service Deployments
Guest Introspection and McAfee MOVE are service deployments installed on a per cluster basis using the vSphere web client. Guest Introspection must be deployed before McAfee MOVE. Once a cluster has a service deployment installed any new host added to the cluster automatically receives the ESX Agents.
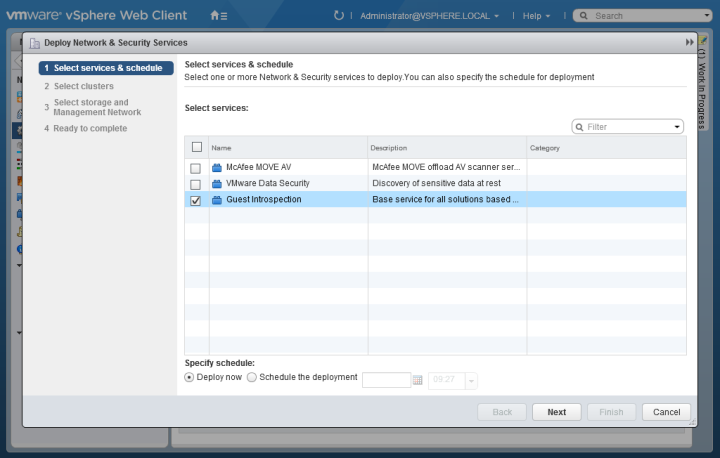
To deploy Guest Introspection log into the vSphere web client and browse to Networking & Security, then click Installation. Click the green plus symbol to add a new service deployment.

In the new service deployment screen select Guest Introspection and click Next.
Select the cluster or clusters to deploy the service to and click Next.
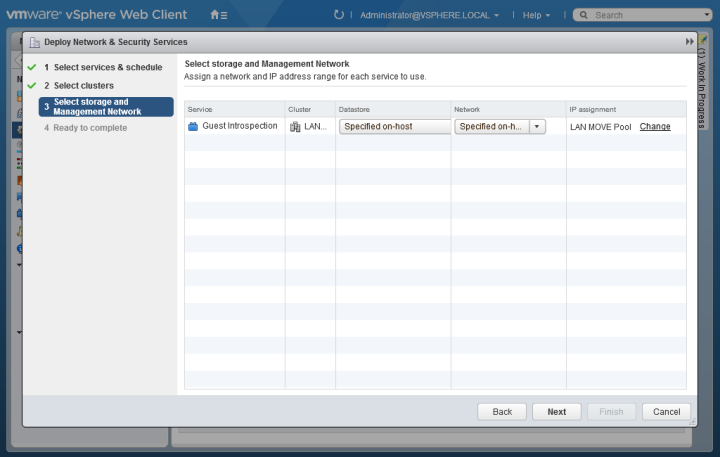
Select the storage and management network for the ESX Agents, the default IP assignment is DHCP, ensure the selected network has access to a DHCP server. Alternatively click Change and select IP Pool. You can select an existing IP Pool or create a new one with the necessary network details. If your IP Pool fills up follow the steps outlined here to extend. When the storage and network settings are configured click Next.
Review the details on the confirmation page and click Finish.
The service will now be deployed, the status will be displayed in the Installation Status column. You will also see the ESX Agents being deployed in the vSphere recent tasks pane. Once complete the installation status should show succeeded and the service status ok.
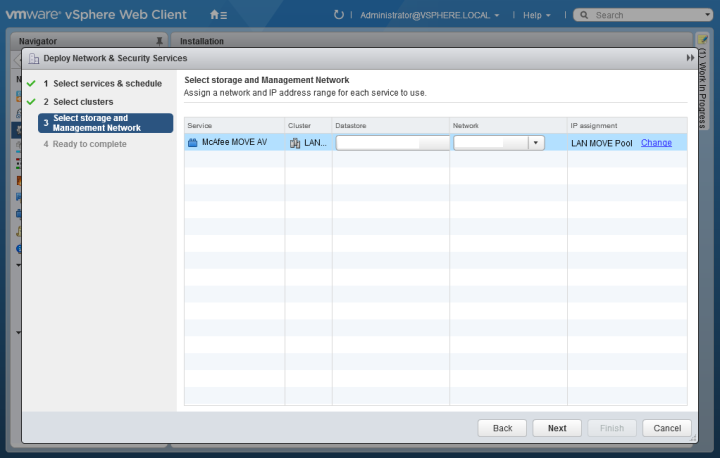
Click the green plus symbol to add a new service deployment. In the new service deployment screen select McAfee MOVE AV and click Next.

Select the cluster or clusters to deploy the service to and click Next.
Select the storage and management network for the ESX Agents, the default IP assignment is DHCP, ensure the selected network has access to a DHCP server. Alternatively click Change and select IP Pool. You can select an existing IP Pool or create a new one with the necessary network details. If your IP Pool fills up follow the steps outlined here to extend. When the storage and network settings are configured click Next.
Review the details on the confirmation page and click Finish.
The service will now be deployed, the status will be displayed in the Installation Status column. You will also see the ESX Agents being deployed in the vSphere recent tasks pane. Once complete the installation status should show succeeded and the service status ok. Each host will now contain an ESX Agents resource group with the installed service deployments.

If you are using stateless environments then you should update the Auto Deploy image with the NSX VIBs, otherwise the Guest Introspection status will change to not ready after a host is rebooted.
Browse to https:///bin/vdn/nwfabric.properties and find the VIB URL for your version of ESXi, open the relevant URL which will auto download vxlan.zip. For assistance with updating Auto Deploy images see the VMware Auto Deploy Guide.
Part 4 – Service Composer
The final stage is to create and apply security policies to the security group containing virtual machines that you want to protect. McAfee MOVE is optimised for virtual environments and as such the settings out of the box are set to provide maximum protection with minimum overhead. However you can exclude certain file types and create on-access scan schedules tailored to your environment if preferred.
In this example we will be applying the default McAfee scan policy. To create your own scan policies log in to McAfee ePO and browse to Menu, Policy, Policy Catalog and select New Policy. Remember any scan policies created in ePO are automatically exported to NSX.
In the vSphere web client go to Networking & Security, Service Composer and open the Security Policies tab. Click the New Security Policy icon.
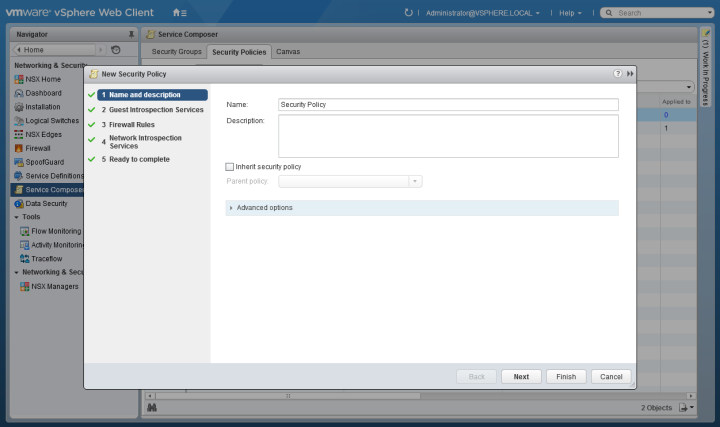
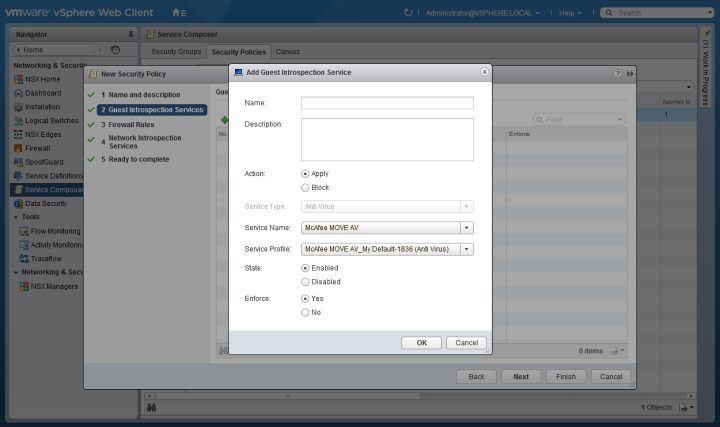
Add a new Guest Introspection Service that applies the service profile from ePO, in our case this is the McAfee MOVE AV My Default policy. Click Ok and Finish.
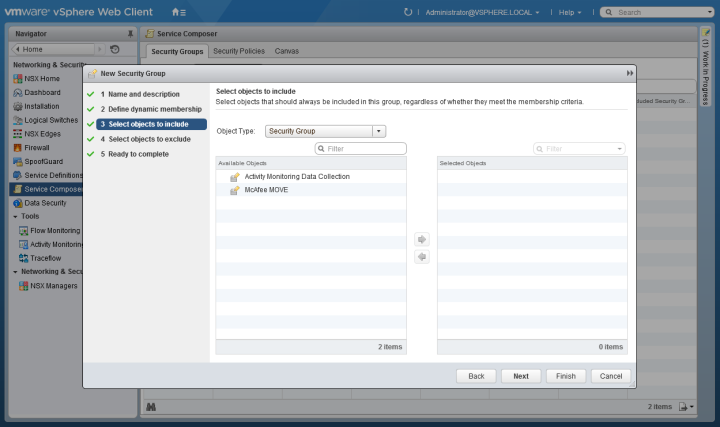
Now we need to create a security group to apply the policy to, select the Security Groups tab and click the New Security Group icon. Enter a group name and description, configure the objects to include and exclude and click Finish. (You can change the Object Type to datacentres, clusters, virtual machines, etc.)
Finally we apply the policy to the newly created group by clicking the Apply Policy icon. Select the policy and group to apply to and click Ok.
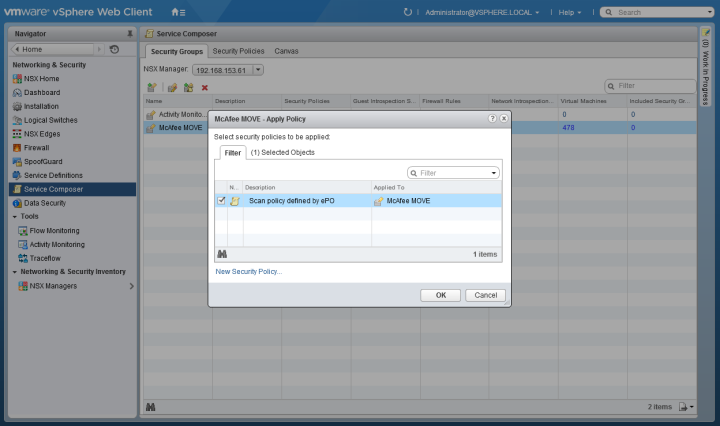
The default policy is now applied and members of the security group are protected. Depending on your environment and existing ePO policy standards you may want to setup separate policies such as quarantine, tagging, etc. For further assistance with McAfee policies refer to the MOVE AV Agentless Product Guide.

Thank you. very nice tutorial. Just a quick question. If I have a problematic appliance, can I simply delete it from the specific vmware host, and NSX will then create a new instance of the appliance?
LikeLike
Hi, best practise to remove and redeploy ESX Agents / SVMs through the Service Deployments tab in NSX Manager, rather than modifying or deleting the agents direct.
LikeLike
Thanks for the tip. So it turns out NSX will NOT automatically deploy sva after deletion on missing hosts. It will show you a warning in “Networking & Security\Installation\Service Deployments” tab under “service status”. You can either click on the service status or the little “resolve” tool icon. This will initiate the McAfee SVA deployment process on the hosts that are missing it. Once done, you may have to reboot the sva appliances themselves to be properly recognized by ePO. Also the warning in NSX should disappear.
LikeLike
Hi, if you have a problem with one of the appliance, just remove the host from the cluster, it will automaticly uninstall McAfee Move and Guest Introspection. After uninstall completes move the host back to the cluster, both appliances will install automaticly.
LikeLike
If we were to leverage NSX IDFW functionality on top of MacAfee MOVE, do we need to install another Guest Introspection SVM??
LikeLike
It will use the existing guest introspection agent
LikeLike
Hi, running esxi 6.0 and NSX 6.2.4 with Move 4.5. All deployments have been completed and tested multiple machines using eicar. We are having an issue where that protection status on the majority of the VMs is not being reported properly. Have a ticket open with Mcafee for months now with no luck. Was just curious if you had ever seen this issue, it seems to be fairly prevalent in most of the forums but no resolution.
LikeLike
Hi Sir just a queston, i did everything posted here but it seems that i cannot find the edit under the actions button when i go to configuration nsx manager. it only shows show column and there are no accounts detected there. i have checked in all the extension and the packages by the way. i appreciate the help.
LikeLike
We are using McAfee Move Agentless 4.5.1 and the amount of CPU usage is just insane… Is there a way to fix that?
Thanks
LikeLike
Hello, yes there is a fix from McAfee see: https://kc.mcafee.com/corporate/index?page=content&id=PD27401. We had the same problem and opened a SR at McAfee. We recieved the Fix to test at our environement. McAfee released the Fix just a view days a go. hope this will help to you too.
LikeLike
Great guide, MUCH better than the 116 Page McAfee installation guide
LikeLike
We wish to use NSX 6.4 solely to deploy and utilize MOVE Agentless AV. Is it necessary to configure transport zones, logical switches, controller clusters, etc?
LikeLiked by 1 person
No, just deploy the NSX Manager register with vCenter and then use service deployments to push out Guest Introspection and MOVE SVMs. No other NSX components needed.
LikeLiked by 2 people
i have deployed all this correctly, just one question when deploying the Virtual Aplliances/Machine they are all name McAfee MOVE AV (x) in Vcetner, i have tried renaming but they revert back to McAfee MOVE AV (x), is there anyway to achieve a rename to something more in line with our naming conventions or is this just how it work?
LikeLike