VMware Project Arctic Graduates to vSphere+

Introduction

Today, June 28 2022, VMware announced vSphere+ and vSAN+; subscription based offerings of their enterprise compute and storage virtualisation solutions.

First mooted during VMworld 2021, Project Arctic promised to deliver a cloud operating model to customer’s data centre and edge locations. At a high level, that means hands-off maintenance, proactive monitoring, pay-as-you-grow consumption, subscription billing, and a shift to opex funding.

Furthermore, vSphere subscriptions allow VMware to integrate products and services as features. VMware Cross-Cloud Services will enable on-demand scale out capacity and disaster recovery capabilities. We know from the general industry shift towards Software-as-a-Service (SaaS), that the frequency of development cycles and feature delivery are increased, resulting in faster and greater value to the end customer.

The release of vSphere+ and vSAN+ is VMware’s first iteration of the Project Arctic feature set, with more capabilities and products to be added. In this release, customers can expect to benefit from simplified operations, faster time to value, and future investment in IT strategy. Find out more at the vSphere+ microsite.

What is vSphere+?

The launch of vSphere+ and vSAN+ provides customers with a subscription to compute and storage virtualisation solutions. It is aimed at organisations wanting to retain an on-premises footprint, either data centre or edge, with a consistent operating experience to their cloud infrastructure.

This means it is easy for brownfield environments to adopt, and improve their operational processes and security posture. vSphere+ is more than just a subscription to an existing product, it also offers administrators the following benefits:

  • Aggregate vCenter Servers and global infrastructure into a single view
  • VMware assisted lifecycle management, initially for vCenter Server
  • Significantly lower maintenance touch, and reduced down time with vCenter Server Reduced Downtime Upgrades
  • Faster access to new features, fixes, and security patches
  • Check for configuration drift, security issues, consistent errors, and update status across all vCenters and clusters
  • Enable access to the embedded Tanzu services for build, run, and manage, of modern container based applications
  • Global monitoring of VMware environments, see examples in this vSphere+ Tech Zone blog
  • Deploy virtual machines to multiple platforms from anywhere with the new cloud admin interface
  • Co-term licensing and support across VMware environments with flexible scaling options
  • Removes the need for individual vCenter Server licenses (see the licensing section below)

vSphere+ introduces a new cloud admin portal, this is an additional SaaS control plane, which interacts with a gateway server on-premises. The sections below go into more technical detail, but the vCenter Servers do not talk directly out to the Internet, and no workloads or components are moved to the cloud as part of this operating model.

The term cloud-like operating model relates to features like the one-click vCenter updates, one-click Kubernetes cluster enablement (a cloud native container orchestration tool), and flexible subscription, or operating expenditure, nature of the service.

Many customers want the benefits of cloud, namely flexible consumption, minimal maintenance, built-in resilience, developer agility, and anywhere management. They may also need to retain some on-premises infrastructure, for data privacy, security, or sovereignty reasons, and for high-performance or low-latency requirements. The introduction of vSphere+ aims to provide these cloud benefits in the remaining data centre or edge locations.

You can read more about the admin services and developer services available through the new cloud portal, as well as the full range of benefits introduced by vSphere+, in the blog VMware vSphere+ Introducing The Multi-Cloud Workload Platform.

vSphere+ Benefits

How Does vSphere+ Work?

Beyond the licensing information in the section below, there are some further technical considerations and clarifications.

Since the vSphere infrastructure on-premises are already deployed, there is no impact to those existing vSphere, vCenter, or vSAN environments. The vCenter Server needs to be running a minimum of version 7.0.3, so there may be a vCenter upgrade, but there is no vSphere/ESXi update required. vCenter 7.0.3 is backwards compatible with vSphere 6.5 onwards, although note that vSphere 6.x reaches end of support on 15 October 2022.

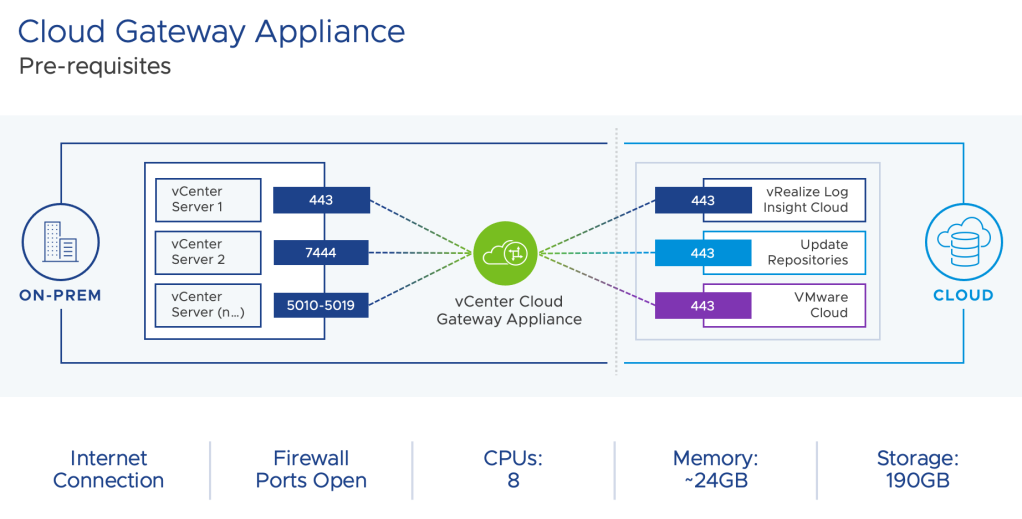
A Cloud Gateway appliance is used to connect the on-premises vSphere estate with the VMware Cloud control plane. The appliance is a standard OVA, here is some additional information:

  • The appliance needs 8 CPU, ~24 GB RAM, 190 GB disk, and a secondary IP address
  • The appliance does not need backing up or HA deployment
  • The appliance is stateless and can easily be deleted and re-deployed in the event of any issues
  • There is an admin interface for setting minimal configuration such as Internet proxy
  • Lifecycle management of the appliance is automated from the cloud control plane
  • There is a maximum latency requirement of 100ms from the vCenter to the gateway appliance, and from the gateway to the cloud portal
  • The gateway appliance has limited access to the customer environment
  • Communication between the gateway appliance and cloud portal is fully encrypted and there is no VPN requirement
  • The gateway appliance needs outbound HTTPS connectivity only, and there are no network charges
  • The gateway appliance also uploads logs to VMware support, accelerating troubleshooting during incidents
  • The gateway appliance is the point of authentication, and no usernames and passwords are transmitted to the cloud
  • Data is not shared with third parties or used for marketing purposes
  • You can have multiple gateway appliances, with up to 4 vCenter Servers per gateway (note that there is no change in vCenter and vSphere configuration maximums)
vSphere+ Cloud Gateway Appliance High Level Architecture

Subscription services for vSphere+ and vSAN+ can be activated from the cloud portal. Host billing and licensing is also managed here, with no need to install license keys. Outside of vCenter lifecycle management, and subtle differences like the removal of license keys, there is no day-to-day change in how you manage and operate the vSphere environment.

If the gateway appliance, or Internet connection, is lost the vSphere environment continues to work as normal. If the gateway has not connected to the cloud control plane after 24 hours then vSphere administrators will see advisory messages bringing this to their attention, on the login page.

For vCenter updates, VMware do not apply updates automatically without informing the customer. The customer has complete control over the planning and scheduling of updates across vCenter Servers. When a new update is available a notification is generated, and the customer chooses when to have the update applied. The inventory will apply a traffic light system for vCenter instances depending on how many versions behind the latest release they might be.

How Does vSphere+ Licensing Work?

Previously, virtualisation customers would shell out a large upfront cost for perpetual licenses they would own outright. To deliver full value the perpetual license was supplemented with SnS (Support and Subscription), adding technical support, and access to the latest updates and security patches.

With perpetual licenses and SnS renewals, the vCenter Server license (per instance) and vSphere license (per CPU) were purchased separately. The vCenter Server provides overarching management capabilities, including enterprise features like resource balancing and High Availability (HA). The hypervisor vSphere, or ESXi, is installed on physical servers and facilitates compute virtualisation.

From July 2022, customers can upgrade to subscription based offerings of vSphere+ and vSAN+ rather than the traditional SnS renewal. You may have seen a similar early access program, branded vSphere Advantage. Both vSphere Advantage and Project Arctic are officially named vSphere+ at launch.

The vSphere+ license will include vSphere (for the core count stipulated), vCenter Server (for unlimited instances), the new vSphere admin service (SaaS Based), the Tanzu Standard runtime, and Tanzu Mission Control Essentials. Tanzu services enable build, run, and manage for modern applications through the use of containers and Kubernetes orchestration, directly within the hypervisor.

The version of vSphere included with vSphere+ has feature parity with vSphere Enterprise Plus, and production support. You can view the full vSphere Enterprise Plus feature set here.

Once a vCenter Server is registered with the cloud control plane all connected hosts and associated CPUs will be counted as licensed physical cores. Note that 16 cores make up 1 CPU, which is a change to the existing perpetual limit where 1 CPU is currently valid for up to 32 cores. As physical servers are added or removed, the corresponding core count is increased or decreased.

Core commits can be made for 1, 3, or 5 year periods, with additional cores billed as overage (or the commit level increased). Any overage is calculated per hour and billed in arrears at the end of the month. A customer can run a combination of vSphere+ and perpetual vSphere, however they need to be registered with different vCenter Servers.

How Does vSAN+ Licensing Work?

The vSAN+ license is available as an add-on to vSphere+, it cannot be purchased separately. As the license is an add-on it automatically co-terms with the vSphere+ duration. Commit and overage terms are the same as vSphere+.

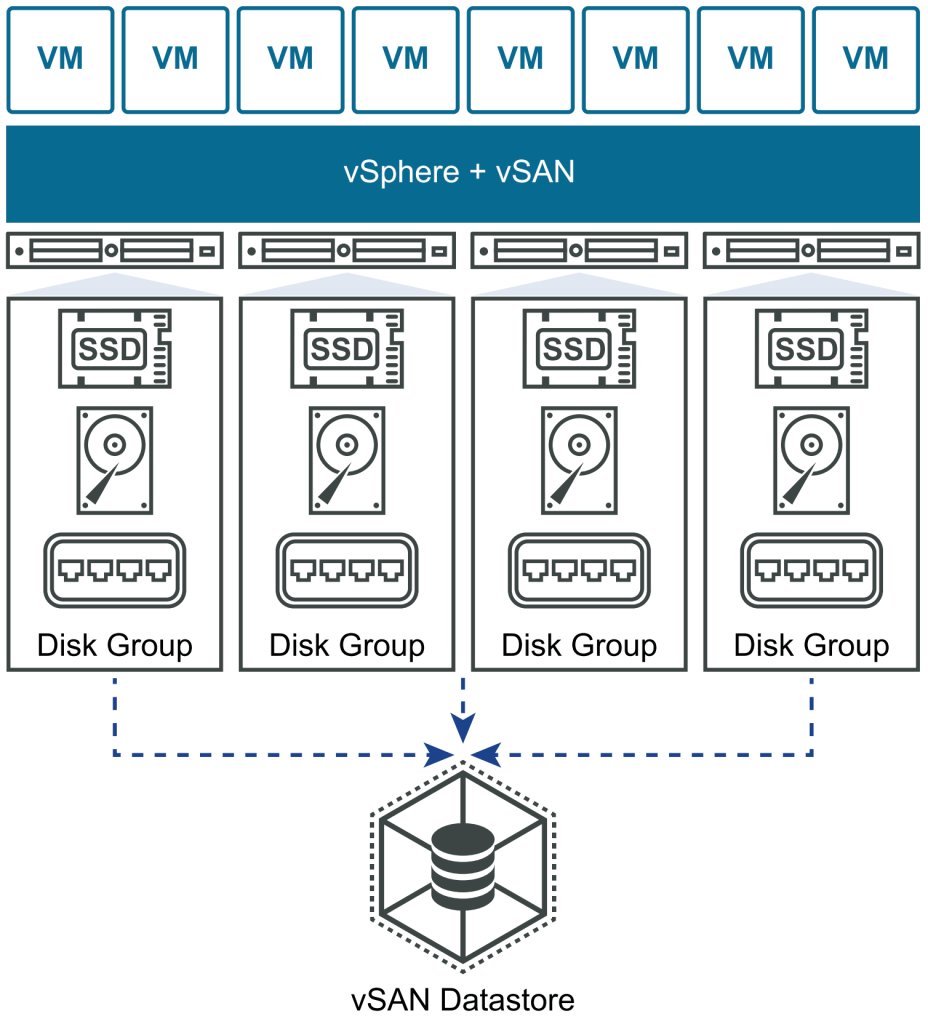
Using vSAN+, customers benefit from centralised management, global inventory monitoring, and global alert status from the cloud console. Existing vSAN datastores are integrated into the cloud portal virtual machine provisioning workflow, to allow deployment of workloads to a vSAN cluster from anywhere. You can read more in the Introducing vSAN+ blog.

The vSAN+ license has feature parity with vSAN Enterprise, you can view the full vSAN feature list here. At initial release, lifecycle management only covers vCenter Server. It is likely that in the future vSphere/vSAN lifecycle management may also be added to Project Arctic.

How to Install vSphere 7.0 – vSAN 7.0

How to Install vSphere 7.0 – vSAN 7.0

Introduction

This second post in a new lab series provides a walkthrough for installing the latest iteration of vSAN 7. At the time of writing the latest version of vSAN is vSAN 7.0 Update 1. To read about what’s new see vSphere 7 and vSAN 7 Headline New Features.

VMware vSAN is a software-defined storage solution baked directly into the vSphere hypervisor. vSAN enables aggregation of local or directly-attached devices and pools them together across hosts in a vSphere cluster to provide a single shared storage pool. Functionality is abstracted from the underlying hardware and managed at a software level, within vCenter, to provide granular policy based availability and controls. Non-disruptive scale out can be achieved by adding more ESXi hosts, either in the same cluster or a new cluster, and scale up by adding more disks to the existing hardware. Multiple vSAN clusters can be created and managed within a single vCenter Server. Since vSAN is already implemented directly into ESXi, activating the functionality simply requires planning and enabling the configuration, along with the appropriate VMware vSAN licenses.

In this example vSAN will be configured in a lab environment using a 2 host cluster (Intel NUC Bean Canyon) running vSphere 7 U1C, with a third node acting as the vSAN witness. As of vSAN 7.0 U1 a single witness appliance can support up to 64 2-node clusters. If you’re looking for more information on running a vSphere lab on the Intel NUC range check out the VMware Homelab section of virten.net, which has some great guides and resources.

vSAN 7.0 Install Guide

vSAN can be configured in an all-flash or hybrid setup. In a hybrid setup, flash is used for the cache with spinning disks providing the capacity tier. Although all local capacity devices are pooled together and shared across hosts in the cluster; an optimal vSAN configuration will contain hosts with the same or similar physical storage configurations, balancing storage devices consistently across the cluster. That said, hosts without any contributing storage can also join the cluster and run virtual machines. In this type of setup, planning the deployment to cover fault tolerance and protection against loss of specific contributing nodes is of particular importance.

All hosts contributing storage devices to the cluster must include at least one flash device for local cache, alongside at least one capacity device. For hybrid configurations, the flash device must be a minimum of 10% of the anticipated consumed storage of the capacity tier, and this should account for future growth to prevent reduced performance over time as the consumed storage grows. The cache for each host in any setup does not count towards the overall size of the shared datastore. Cache and capacity devices in a host form one or more disk groups, outlined in the high level image below. For more information on capacity and sizing considerations when designing a vSAN deployment, review the VMware vSAN Design Guide and the Designing and Sizing a vSAN Cluster documentation.

VMware vSAN high level overview from the vSAN 7.0 Planning and Deployment documentation

VMware vSAN is an enterprise solution and supports all VMware features that rely on shared storage, like High Availability, Distributed Resource Scheduler, and Storage vMotion. vSAN also includes features like stretched clustering, and fault domain implementations. Hosts in a vSAN cluster can also mount other VMFS and NFS datastores, although vSAN itself does not require or rely on any kind of external storage or Storage Area Network (SAN). You can find more information in the vSAN Planning and Deployment – VMware vSphere 7.0 documentation, which should be studied before configuring vSAN, along with the relevant release notes – in this example I am using vSAN 7.0 Update 1.

System Requirements

  • VMware vSAN can be built on the following hardware:
    • vSAN ReadyNode – preconfigured solutions using hardware tested and certified for vSAN by the server OEM and VMware
    • Turn key deployments – fully packaged Hyper-Converged Infrastructure (HCI) solutions like Dell EMC VxRail
    • Custom solution – hardware components compiled by the user, all hardware used with vSphere 7 and vSAN 7 must be listed in the VMware Compatibility Guide
  • To check version compatibility with other VMware products, see also the VMware Product Interoperability Matrices.
  • A standard vSAN cluster needs at least 3 hosts, with a maximum of 64. At least 4 hosts are recommended for maximum availability due to limitations around maintenance and protection after a failure with 3-host clusters. The 2-host vSAN cluster with witness is also a separate configuration and exception.
  • Each physical host contributing capacity to the vSAN cluster requires:
    • 1 x SAS or SATA HBA, or RAID controller in passthrough mode
    • 1 x SAS or SATA SSD, or PCIe flash device, for the cache
    • At least 1 x (further) SAS or SATA SSD, or PCIe flash device, for capacity in an all-flash disk group, OR; at least 1 x SAS or NL-SAS magnetic disk, for capacity in a hybrid disk group, with no existing partition configuration in both cases
    • A minimum of 8 GB RAM, but in most cases it is preferable to have at least 32 GB RAM
    • Dedicated 1 Gbps bandwidth for hybrid configuration (10 Gbps recommended), OR; dedicated or shared 10 Gbps for all-flash configurations (25 Gb, 40 Gb, and 100 Gb are also supported) – for best results new environments should consider 25 Gbps connectivity using vSphere Distributed Switches with Network I/O Control (vSphere Standard Switches are also supported but do not offer QoS)
    • A configured VMkernel network adapter for vSAN traffic
    • A maximum network latency of 1 ms RTT for standard vSAN clusters (200 ms to a witness node, 5 ms for stretched clusters)
    • Layer 2 or Layer 3 network connectivity between hosts in the cluster (jumbo frames are supported but not required, if jumbo frames are already in use then the setting should be configured end-to-end across the environment)
    • A valid vSAN license, normally managed per CPU although per OSI licensing is available for branch office configurations
  • When sizing a vSAN cluster keep in mind the total capacity of all disks pooled together is only the raw capacity. True payload capacity can be calculated using the primary level of failures to tolerate, in conjunction with the failure tolerance method (RAID). For more information review the Designing and Sizing a vSAN Cluster documentation.
  • Prior to vSAN 7.0 U1, a general recommendation to keep the vSAN datastore below 70% usage was made. The latest release has made substantial improvements to improve usage of free capacity, and as such can be calculated per cluster based on variables outlined in the Designing for Capacity section of the VMware vSAN Design Guide.
  • It is good practice to synchronise ESXi and vCenter versions, and run the latest release. Hosts should also be in the same L2 subnet for best networking performance.
  • If your environment has firewalls review the list of Required ports for vSAN.
  • For larger enterprise environments see also the vSAN Configuration Limits.

vSAN Activation

In this example we’ll use the vSphere Cluster Quickstart page to configure vSAN. Quickstart consolidates the storage and networking workflows required to activate vSAN. A new cluster has been created containing 2 ESXi hosts running 7.0 U1C. The hosts are in maintenance mode and have no existing datastores or partition information beyond the standard boot disk. Both hosts are using PCIe flash devices in passthrough mode.

A third host will act as the witness node. The witness for a 2-host vSAN cluster needs to have available disks for writing metadata; at least 10 GB cache and 15 GB capacity. All 3 hosts need a VMkernel port configured. Since this is a lab environment, with limited physical connections and bandwidth, I have configured the management vmk port to also be used for vSAN traffic. The vmk port is a virtual adapter used to handle VMware service traffic for various functionality. If you need guidance on setting up the VMkernel adapter for vSAN, see the How to Configure vSAN VMkernel Networking Knowledge Base page.

Shared vmk0 for management and vSAN traffic (lab only)

Now that the VMkernel ports are setup for vSAN traffic, and there is IP-reachability between the vSAN cluster hosts and witness node, we can start the vSAN configuration. Select the cluster in the vSphere client and click Configure > Quickstart. For stage 1 click Edit and select the vSAN service. After a couple of seconds the pre-requisite health checks in stage 2 are complete. Providing no issues arise move on to stage 3 and click Configure.

vSAN Configuration Quickstart

Configure the network settings for the vSAN cluster. The Quickstart setup uses vSphere Distributed Switches, which are recommended, although vSphere Standard Switches are also supported. In my lab, since I already enabled vSAN traffic on the management port, I can skip the Distributed Switch setup, and click Next.

vSAN cluster deployment network configuration

Configure the vSAN cluster settings, like encryption, compression, and deduplication, as required. In this example I am using the Two node vSAN cluster deployment type. Click Next.

vSAN cluster deployment type

Select the disks and tier to be claimed for the vSAN cluster. Remember that vSAN can only use local or direct-attached storage, and not remote storage. In this example 2 x 500 GB flash devices have been allocated to the capacity tier, and 2 x 50 GB flash devices have been allocated to the cache tier. The total of the claimed disks is 1.07 TB. This does not provide any component failure protection and is only for lab purposes. I accept the recommended configuration and click Next.

vSAN cluster deployment storage types

Since my vSAN cluster is only 2-nodes, I need to add a witness host. The witness host, with available disks for metadata, and vSAN enabled VMkernel adapter for communication, is selected and passes the compatibility checks. Click Next to continue.

vSAN cluster deployment with witness host

Claim the disks for the witness host to use, in this case I have allocated a 10 GB disk for the cache tier metadata, and 15 GB disk for the capacity tier metadata. Click Next to continue.

vSAN cluster deployments with witness host disks

Review the settings configured and click Finish to deploy the vSAN configuration. Although the Quickstart interface returns a message pretty quickly saying the cluster is configured, keep an eye on activity in the Recent Tasks pane as there is likely still configuration taking place.

vSAN cluster deployment review and finalise

The easiest way to check the vSAN status is to select the cluster, click Monitor, and scroll down to vSAN. Skyline Health will show the vSAN health checks associated with the cluster, you can also see physical and virtual object states, capacity and performance.

vSAN capacity monitoring

To view or manually edit the cluster settings select the cluster, click Configure and scroll down to vSAN. Services shows the available vSAN services and their configuration, in my lab environment most of these are disabled. Disk Management shows the configured disk groups and their health state. In this lab scenario I only have 2 fault domains configured.

vSAN disk group configurations

Fault domains allow grouping together of physical hosts to protect against common failures like chassis or racks. It is best practice to configure consistent fault domains with the same number of hosts across the environment. Consider the impact on placement of data and overall number of host failures to tolerate when configuring fault domains. Clearly for a lab environment or a 2-node cluster in a small branch office setup fault domains and data availability cannot be applied in the same way as larger deployments. The following resources will help with designing such environments:

Finally, if you want to create a new storage policy to apply to the vSAN datastore, or create multiple granular policies that can be applied at VM or VMDK level, this can be done from the Menu dropdown, Policies and Profiles, VM Storage Policies. If you need more information on the policy options available review the VM Storage Policy Design Considerations documentation.

Featured image by Jonas Svidras on Unsplash

How to Install vSphere 7.0 – vCenter Server Appliance

Introduction

This opening post in a new lab series provides a walkthrough for installing the latest iteration of vSphere 7.0; bringing cloud-native workloads to the data centre with embedded Kubernetes and Tanzu. vSphere 7.0 was initially released in June 2020, and followed up with vSphere 7.0 Update 1 in October 2020. The current version at the time of writing is vSphere 7.0 Update 1c. You can track the latest releases and build numbers in this KB article.

ESXi is the market leading hypervisor, able to abstract and pool compute resources across commodity hardware, and implement granular based controls and automation. ESXi needs to be installed first on a physical machine to provide at least one host for the vCenter virtual appliance to be deployed to. vCenter Server then provides the single management pane for physical hosts and virtual machines, along with enterprise functionality like vMotion for live workload portability, High Availability for workload failover, and Distributed Resource Scheduler for automatically balancing resources. To read about what’s new in vSphere 7 see vSphere 7 and vSAN 7 Headline New Features.

In this example vCenter Server will be deployed in a lab environment to an Intel NUC Bean Canyon running ESXi 7.0 U1C. If you’re looking for more information on running a vSphere lab on the Intel NUC range check out the VMware Homelab section of virten.net, which has some great guides and resources.

vCenter 7.0 Install Guide

Several design decisions have been removed in vSphere 7 as component topology and lifecycle management have been drastically simplified. The external Platform Services Controller (PSC) deployment model available in versions 6.0 and 6.5 has been removed, only the embedded option is offered in vSphere 7.

Furthermore, running vCenter Server on Windows has finally been deprecated, and all deployments must now use the vCenter Server Appliance (VCSA). A migration path from Windows vCenter Servers 6.5 and 6.7 to VCSA 7.0 is available. The VCSA is an optimised virtual appliance running Photon OS 3.0, and contains all the vCenter required services, such as SSO, Certificate Authority, PostgreSQL, Lifecycle Manager, etc. You can find more information on the full list of services in detail from the vCenter Server Installation and Setup documentation.

The installer file for vSphere can be downloaded here, a 60 day evaluation period is automatically applied. The vCenter Server installation bundle comes as an ISO file mountable on a Windows, Linux, or Mac device. The installer must be run from a machine with network connectivity to the ESXi host or vCenter Server where the new appliance will be deployed. The target host or vCenter must be running vSphere version 6.5 or later. For multiple or repeated installations in large environments the vCenter Server Appliance and configuration can also be silently deployed using CLI and JSON file. Make sure you review the release notes with your download before starting, in this example I am using vCenter Server 7.0 Update 1c.

The vSphere download packages available from my.vmware.com

System Requirements

  • Before beginning the installation; Fully Qualified Domain Name (FQDN) resolution should be in place with forward and reverse DNS A records added, and replicated if applicable, for the vCenter Server hostname.
  • vCenter Server 7.0 can only be deployed to, and manage, ESXi hosts v6.5 or later. There is no direct upgrade path for hosts running ESXi v5.5 or 6.0 to v7.0.
  • If you are deploying to an ESXi host the host must not be in maintenance mode or lockdown mode. The ESXi host and all vSphere components should be configured to use Network Time Protocol (NTP), the installation can fail or the vpxd service may not be able to start if the clocks are not synchronised.
  • Check the compatibility of any third party products and plugins that might be used for backups, anti-virus, monitoring, etc. as these may need upgrading for vSphere 7.0 compatibility.
  • To check version compatibility with other VMware products, see the VMware Product Interoperability Matrices.
  • In addition to software, you should also check the hardware in use is compatible with vSphere 7 using the VMware Compatibility Guide. VMware support enterprise hardware, and therefore the Intel NUC devices are not listed. This isn’t an issue in a lab environment but should not be implemented in production.
  • The vCenter Server Appliance requires the following compute specifications, this includes vSphere Lifecycle Manager running as a service on the appliance:
    • Tiny (up to 10 hosts, 100 VMs) – 2 CPUs, 12 GB RAM
    • Small (up to 100 hosts, 1000 VMs) – 4 CPUs, 19 GB RAM
    • Medium (up to 400 hosts, 4000 VMs) – 8 CPUs, 28 GB RAM
    • Large (up to 1000 hosts, 10,000 VMs) – 16 CPUs, 37 GB RAM
    • X-Large (up to 2000 hosts, 35,000 VMs) – 24 CPUs, 56 GB RAM
  • Storage resources for the vCenter Server Appliance also vary based on the database requirements above:
    • Tiny – Default: 415 GB, Large: 1490 GB, X-Large: 3245 GB
    • Small – Default: 480 GB, Large: 1535 GB, X-Large: 3295 GB
    • Medium – Default: 700 GB, Large: 1700 GB, X-Large: 3460 GB
    • Large – Default: 1065 GB, Large: 1765 GB, X-Large: 3525 GB
    • X-Large – Default: 1805 GB, Large: 1905 GB, X-Large: 3665 GB
  • If your environment has firewalls review the list of Required ports for vCenter Server.
  • For large and enterprise environments review the vSphere 7.0 Configuration Limits.

Installation Stage 1

The vCenter Server 7 installation is practically identical to its predecessors’ versions 6.5 and 6.7. Download and mount the ISO on your computer, then browse to the corresponding directory for your operating system and open the installer file. In my case \vcsa-ui-installer\mac\installer.app. As we are installing a new instance, click Install.

vCenter 7.0 Installer: all options are consolidated into a single ISO

The installation is split into 2 stages, we begin with deploying the appliance in OVF format to an ESXi or vCenter target. The second stage configures the appliance. Note that the External PSC deployment is no longer available. Click Next.

Deploy vCenter Server: introduction page

Accept the license agreement and click Next.

Deploy vCenter Server: End User License Agreement (EULA)

Enter the FQDN or IP address of VCSA deployment target, this can be a vCenter Server or ESXi host that meets the system requirements outlined above. Enter the credentials of an administrative or root user and click Next, the installer will validate access.

When prompted with an untrusted SSL certificate warning, confirm the SHA1 thumbprint displayed is that of the target ESXi host or vCenter Server, and click Yes to accept. Also note that if you are connecting to an ESXi host you will only see networks on the local hosts standard switch when it comes to configuring network settings in an upcoming step. If you require a network on an existing vSphere Distributed Switch (VDS) then you will need to connect to the VDS source vCenter as your deployment target. Alternatively you can make this change post-deployment.

Deploy vCenter Server: deployment target settings

Enter the VM name for the VCSA, the appliance name must not be more than 80 characters in length and cannot contain the characters percent (%) forward slash (/) or backslash (\). Set the root password, which needs to be at least 8 characters, with a number, uppercase and lowercase letters, and a special character. Click Next to continue.

Deploy vCenter Server: VCSA credentials

Select the deployment size in line with the number of hosts and virtual machines that will be managed, click Next.

Deploy vCenter Server: VCSA compute and storage assignment

Select the datastore where the appliance will be deployed, choose thin provisioning if required, and click Next again.

Deploy vCenter Server: datastore and disk mode configuration

Enter the network settings to be applied to the appliance, including IPv4, DNS, and network adapter settings, then click Next.

Deploy vCenter Server: VCSA network settings

On the summary page, click Finish. The appliance will now be deployed.

Deploy vCenter Server: stage 1 installation

Installation Stage 2

Once complete the VCSA is deployed but the services aren’t running, click Continue to move on to stage 2. If at this point you find that the DNS entry was added without leaving sufficient time for client you’re working from to update; then you can still initiate the setup from https://vCenter-FQDN-or-IP:5480 when the vCenter Server hostname is resolving correctly

Deploy vCenter Server: stage 1 complete

Click Next to begin the VCSA setup.

Configure vCenter Server: stage 2

Configure the Network Time Protocol (NTP) servers to enable time synchronisation, and choose the Secure Shell (SSH) state for the appliance; this can be changed later. Then click Next.

Configure vCenter Server: NTP and SSH settings

Enter a unique Single Sign-On (SSO) domain name, the default is vsphere.local. vSphere uses SSO to communicate across its different software components through a secure token exchange mechanism. SSO users can be members of the local domain, or an external trusted source like Active Directory (AD). Most organisations use Microsoft AD and therefore the SSO domain name should not be the same as your Active Directory domain. Configure a password for the SSO administrator, and click Next.

If you already have existing vCenter Servers in an SSO domain that you want to join, using Enhanced Linked Mode functionality (up to 15), enter the administrator credentials for the existing SSO domain.

Configure vCenter Server: SSO settings

Select or deselect the Customer Experience Improvement Program (CEIP) box and click Next.

Configure vCenter Server: Customer Experience Improvement Program (CEIP)

Review the details on the summary page and click Finish.

Configure vCenter Server: finalise details

Click Ok to acknowledge that the VCSA setup cannot be paused or stopped once started. When the installer is complete click Close to close the wizard.

Configure vCenter Server: stage 2 complete

Post-Installation Steps

Connect to the vCenter Server after the 2-stage installation is complete using the IP address or FQDN configured from a web browser: https://vCenter-FQDN-or-IP/ui. Accessing vSphere through the Flash (FLEX) web client has been depreciated, and so the User Interface (UI) defaults to HTML5.

vCenter Server HTML5 client

Once you’re logged into vCenter you can start creating your data centre environments and adding in ESXi hosts. Both vCenter and ESXi are armed with automatic 60 day evaluation periods.

vCenter Server HTML5 client

The following steps may also be useful post-installation of vCenter Server 7.0:

  • You must apply a new vCenter Server license key before the end of the 60 day evaluation. Since this is a home lab environment I am able to use personal keys supplied by the VMware vExpert program:
    • Log into the vSphere Client using the SSO administrator credentials. An orange banner is displayed that will link you directly to the licenses page, alternatively you can select Administration from the Menu drop-down, and click Licenses.
  • Next up if you have an Active Directory domain, then you may want to add it to vCenter as an identity source. This can be configured in the Administration page under Single Sign On and Configuration.
  • The newly deployed vCenter Server can be backed up using file-based backups to a remote file share, or image-based backups of the virtual machine.:
    • For file-based backups supported protocols include FTP, FTPS, HTTP, HTTPS, SFTP, NFS, or SMB. One of the available secure protocols should be used in production environments.
    • File-based backups can be configured in the appliance management interface accessible from a web browser at https://vCenter-FQDN-or-IP:5480, using the root credentials set during deployment.
    • If needed, a file-based backup can be restored to a new vCenter Server on deployment using the Restore option in the opening vCenter Server Installer page. Review the File-Based Backup and Restore of vCenter Server documentation for a full list of included configuration.
  • Windows users may want to enable the VMware Enhanced Authentication Plug-in for integrated Windows authentication.
  • For information on applying an SSL certificate to the vCenter Server Appliance see How-to Secure vCenter Server 7 (VCSA) with a Let’s Encrypt SSL Certificate.
  • If you are having problems with starting vCenter Server double check the system requirements are all in place, then check the installation log outputs identified in the Troubleshooting vCenter Server Installation or Deployment documentation. You may also be able to generate a log bundle for VMware support if you have an appropriate support contract in place.
vCenter Server with ESXi hosts

Featured image by Jonas Svidras on Unsplash