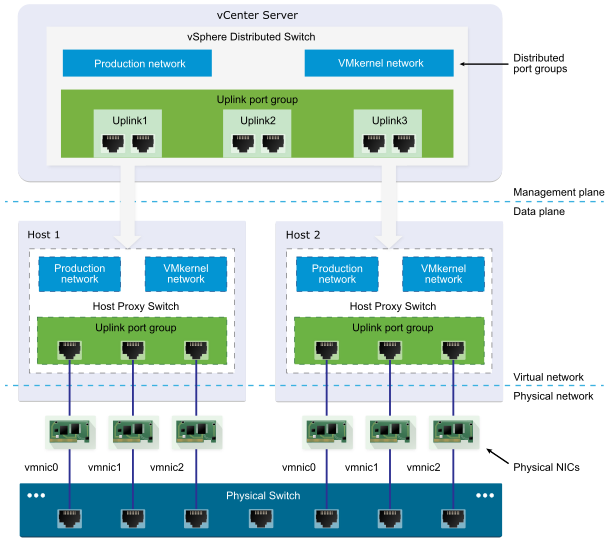
In vSphere networking a Distributed Switch provides centralised management for network configuration across all hosts associated to the Distributed Switch. A vSphere switch is made up of a data plane and a management plane. The data plane resides on each ESXi host and implements package switching, tagging, etc. In a vSphere Standard Switch the management plane also resides on each host, therefore each host must be configured individually which is time consuming, and prone to errors or different configuration standards. The vSphere Distributed Switch separates the management plane using the vCenter Server. By separating the management plane from the data plane we can define functionality, configuration, and standardisation across the ESXi estate.
The following image shows the architecture of a Distributed Switch, from the VMware vSphere 6.5 Documentation Centre. In this post we will walk through the setup of a vSphere Distributed Switch. A vCenter Server and vSphere Enterprise Plus licensing is required, you can sign up for a 60 day trial here.
Create a vSphere Distributed Switch
Open the vSphere web client and right click the datacentre object, select Distributed Switch, New Distributed Switch. The wizard will load, enter a name for the Distributed Switch and click Next.

Select the version to use and click Next. Ensure you use a version compatible with all ESXi hosts that are going to be connected to the Distributed Switch. The version can be upgraded non-disruptively, but cannot be downgraded. If you select an older version then the features listed in newer releases are not available, until such time as the Distributed Switch is upgraded.

Configure the number of uplinks to use. An uplink is a template used to configure physical network adapters mapped from the ESXi host. We assign networks or policies to an uplink to ensure standardisation; as these are propagated to consistent physical NICs of the hosts associated with the Distributed Switch. Make sure the hosts that will use the Distributed Switch have sufficient physical NICs to meet the specified number of uplinks.
Enter a datacentre-unique name for your new port group. Distributed port groups contain networks used by virtual machines and VMkernel traffic. Settings such as NIC teaming, failover, load balancing, VLAN, security, traffic shaping , and other policies are configured on distributed port groups. Click Next.

Review the summary page and click Finish. The Distributed Switch will now be created.

Add Hosts
In the vSphere inventory click the networking tab and select the new Distributed Switch.

Open the Configure tab and select Properties under the Settings menu. You can change the default settings of the virtual switch if required by clicking Edit. Read more about the properties here.

We will now add some hosts to our new switch; from the drop down Actions menu select Add and manage hosts. Click Add hosts and Next to continue.

Click New hosts and select the hosts to associate with the Distributed Switch. If you add multiple hosts and want to configure standardised network settings then tick the template mode box. Click Next.

An additional page is added to the wizard, select the host to use as a template and click Next. We will configure the network settings on this host to be copied to all other hosts associated with the Distributed switch.

Select the tasks to manage, in this example we will configure physical adapters to use for uplinks so select Manage physical adapters and click Next. Each option adds a new configuration page to the wizard.

In the Manage physical network adapters page we assign uplinks to physical NICs. Select the physical NIC, e.g. vmnic1, and click Assign uplink. Assign a physical adapter to each uplink, the number of uplinks was determined when creating the Distributed Switch. In this example since we are using template mode we assign the uplinks and then click Apply to all. This sets the same physical network adapter settings on the other hosts. Click Next.

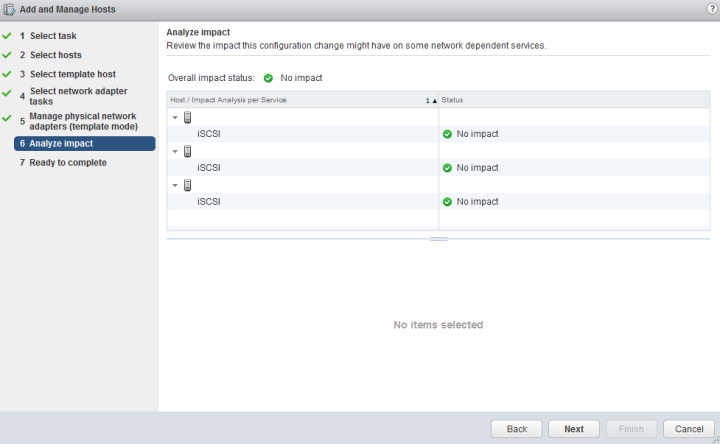
Review the impact on network dependent services, such as iSCSI. If everything is green click Next.
Review the summary page and click Finish.

Add Distributed Port Groups
The next step is to add network configuration, known as port groups. A port group specifies port configuration options, defining how a network connection is made. The port group can contain security policies, traffic shaping policies, VLAN configuration, and so on. When a port group is created it can be used by all hosts associated with the Distributed Switch.
Right click the Distributed Switch and select Distributed Port Group. We can alter the default port group created with the Distributed Switch by selecting Manage Distributed Port Groups. Select the policies to edit and click Next.

Click Select distributed port groups and add the default port group created earlier. Click Next and follow the wizard to configure as required.

We can add new port groups by right clicking the Distributed Switch and selecting Distributed Port Group, New Distributed Port Group. Enter name for the port group and click Next.

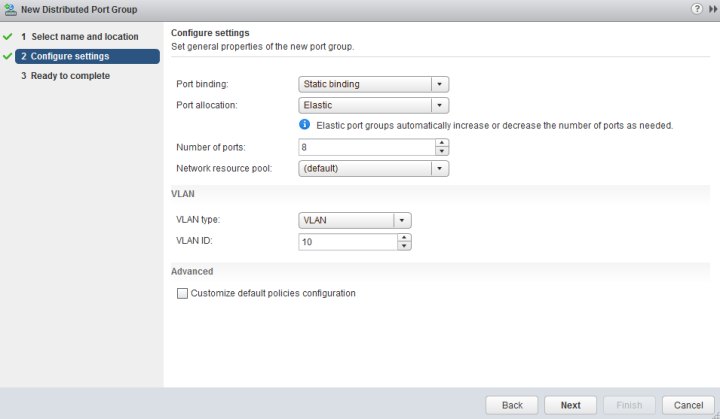
Configure the settings for the port group, in this example I have configured a port group tagged with VLAN 10. Click Next.
Click Finish. Repeat the process if multiple port groups are required.

Virtual machines can now be provisioned to use the networks defined in the distributed port groups. You can find out more about Distributed Switch configuration and advanced settings in the vSphere 6.5 Documentation Centre, or the VMUG Wiki.

thank you very much, article was to the point…
LikeLike