The VMware Multi-Cloud Briefing is an online quarterly series, in its fifth iteration, that brings vision, technology, and customer stories to the table. The briefing series has evolved through cloud platform, operations, and application development since its introduction in the summer of 2020. Both cloud technology and cloud adoption is advancing at a fast pace, and this April briefing provides an opportunity to see what’s new directly from VMware engineering, independent industry experts, and customers.
The latest session is opened with Joel Neeb, VP Execution and Transformation, VMware, and former F-15 pilot. Joel will talk through the history of aviation and the advancements in the cockpit, from having limited technology to running over 300 different instruments. With so many new features and capabilities, there comes a tipping point where it cannot be practically managed by a single operator, or it takes more time than it offers value. These instruments are now streamlined into a handful of features, displayed on screens instead of through switches and dials, with the computer systems surfacing what’s important to the operator at a given time.
We can learn from this approach, and apply similar models to be able to abstract and simplify multi-cloud complexity across different environments and locations. VMware Cross-Cloud Services can remove complexity, whilst enabling the agility of different cloud providers and the freedom to choose the right target environment for each application. Offering standardisation and consistency at the infrastructure layer allows scale and flexibility. Then, as requirements change and new use cases are uncovered, IT teams and developers can move quickly to accelerate overall business transformation.
VMware Cross-Cloud Services
The session continues with quick fire customer stories around streamlining operations with VMware technology, and a customer interview with S&P Global covering their approach to solving multi-cloud complexity. Later, we’ll also hear a partner perspective from DXC Technology, on how they work with customers to deliver multi-cloud outcomes, and what trends they are seeing across the market.
Next is a technology deep dive, starting out with examining how we’ve arrived at the complexity of running environments across public cloud, private cloud, and the edge. You can then expect to see:
How easy it is to add a new VMware environment to a hyperscaler, using vRealize Automation. In this demo we’ll start with an on-premises hosted environment, and scale out by spinning up new environments in the cloud, with the same management tooling and policies.
How to manage multiple cloud environments from a single tool, using vRealize Operations. In this demo we’ll look at a consistent way of managing and optimising resources, performance, capacity, and costs, with a unified troubleshooting interface.
How to add Kubernetes clusters in different hyperscalers to a common management plane, using Tanzu Mission Control. In this demo we’ll see how you can standardise the management of Kubernetes services, which will likely compliment your existing virtual machine infrastructure. Furthermore, we’ll find out how Tanzu Service Mesh can secure the communication of micro-services between environments and across clouds. Tanazu Service Mesh is able to bring micro-services under the same security umbrella, and automate features like mutual TLS encryption across all services.
The final segment is an industry interview with IDC and VMware, talking about what it means for customers to standardise their infrastructure and cloud platforms. There are multiple layers of abstraction and standardisation, covering the likes of management, optimisation, and security. IDC will detail where you can start, and what they see as good first steps.
The April 2022 VMware Multi-Cloud Briefing, and associated launch blog, is now live and available on YouTube. The video is embedded below. You can watch the current and previous briefings on the VMware Multi-Cloud Briefing page, each video is between 30-40 minutes long.
In this post we take a look at a vRealize Operations (vROps) deployment for vSphere 7; building on the installation of vCenter 7.0 U1 and vSAN 7.0 U1. Shortly after installing vROps 8.2, vRealize Operations 8.3 was released. The install process is similar, you can read what’s new here and see the upgrade process here.
vRealize Operations is an IT operations management tool for monitoring full-stack physical, virtual, and cloud infrastructure, along with virtual machine, container, operating system, and application level insights. vROps provides performance and capacity optimisation, monitoring and alerting, troubleshooting and remediation, and dashboards and reporting. vROps also handles private costings, showback, and what-if scenarios for VMware, VMware Cloud, and public cloud workloads. Many of these features have been released with version 8.2, and now work slicker fully integrated into the vROps user interface, rather than a standalone product. Previously vRealize Business would cater for similar costing requirements, but has since been declared end of life.
vRealize Operations can be deployed on-premises to an existing VMware environment, or consumed Software-as-a-Service (SaaS). vRealize Operations Cloud has the same functionality, with the ongoing operational overhead of lifecycle management and maintenance taken care of by VMware. Multiple vCenter Servers or cloud accounts can be managed and monitored from a single vROps instance. For more information on vROps see the What is vRealize Operations product page.
vRealize Operations Manager 8.2 Install Guide
The vRealize Operations Manager installation for lone instances is really straight forward, as is applying management packs for monitoring additional environments. Where the installation may get more complex, is if multiple cluster nodes need to be deployed, along with remote collector nodes, and/or multiple instances. If you think this may apply to you review the complexity levels outlined in the vRealize Operations Manager 8.2 Deployment Guide.
The installation steps below walk through the process of installing vROps using the master node. All deployments start out with a master node, which in some cases is sufficient to manage itself and perform all data collection and analysis operations. Optional nodes can be added in the form of; further data nodes for larger deployments, replica nodes for highly available deployments, and remote collector nodes for distributed deployments. Remote collector nodes, for example, can be used to compress and encrypt data collected at another site or another VMware Cloud platform. This could be an architecture where a solution like Azure VMware Solution is in use, with an on-premises installation of vROps. For more information on the different node types and availability setups see the deployment guide linked above.
When considering the deployment size and node design for vROps, review the VMware KB vRealize Operations Manager Sizing Guidelines, which is kept up to date with sizing requirements for the latest versions. The compute and storage allocations needed depend on your environment, the type of data collected, the data retention period, and the deployment type.
Installation
Before starting ensure you have a static IP address ready for the master node, or (ideally and) a Fully Qualified Domain Name (FQDN) with forward and reverse DNS entries. For larger than single node deployments check the Cluster Requirements section of the deployment guide.
The vRealize Operations Manager appliance can be downloaded in Open Virtualisation Format (OVF) here, and the release note for v8.2.0 here. As with many VMware products a 60 day evaluation period is applied. The vRealize Operations Manager OVF needs to be deployed for each vROps cluster node in the environment. Deployment and configuration of vRealize Operations Manager can also be automated using vRealize Suite Lifecycle Manager.
vRealize Operations Manager download
Log into the vSphere client and deploy the OVF (right click the data centre, cluster, or host object and select Deploy OVF Template).
The deployment interface prompts for the usual options like compute, storage, and IP address allocation, as well as the appliance size based on the sizing guidelines above. Do not include an underscore (_) in the hostname. The disk sizes (20 GB, 250 GB, 4 GB) are the same regardless of the appliance size configured. New disks can be added, but extending existing disks is not supported. Also be aware that snapshots can cause performance degradation and should not be used. For this deployment I have selected a small deployment; 4 CPU, 16 GB RAM.
Once deployed browse to the appliance FQDN or IP address to complete the appliance setup. You can double check the IP address from the virtual machine page in vSphere or the remote console. For larger environments and additional settings like custom certificates, high availability, and multiple nodes select New Installation. In this instance since vROps will be managing only a single vCenter with 3 or 4 hosts I select the Express Installation.
vRealize Operations Manager start page
The vRealize Operations Manager appliance will be set as the master node, this configuration can be scaled out later on if needed. Click Next to continue.
vRealize Operations Manager new cluster setup
Set an administrator password at least 8 characters long, with an uppercase and lowercase letter, number, and special character, then click Next. Note that the user name is admin, and not administrator.
Click Finish to apply the configuration. A loading bar preparing vRealize Operations Manager for first use will appear. This stage can take up to 15 minutes.
vRealize Operations Manager initial setup
Login with the username admin and the password set earlier.
vRealize Operations Manager login page
There are a few final steps to configure before gaining access to the user interface. Click Next.
vRealize Operations Manager final setup
Accept the End User License Agreement (EULA) and click Next.
vRealize Operations Manager terms and conditions
Enter the license information and click Next.
vRealize Operations Manager license information
Select or deselect the Customer Experience Improvement Program (CEIP) option and click Next. Click Finish to progress to the vROps user interface.
vRealize Operations Manager final setup
Finally we’re into vRealize Operations home page, take a look around, or go straight into Add Cloud Account.
vRealize Operations Manager home page
Select the account type, in this case we’re adding a vCenter.
vRealize Operations Manager account types
Enter a name for the account, and the vCenter Server FQDN or IP address. I’m using the default collector group since we are only monitoring a small lab environment. You can test using Validate Connection, then click Add.
vRealize Operations Manager add vCenter Server
Give the vCenter account a few minutes to sync up, the status should change to OK. A message in the right-hand corner will notify that the vCenter collection is in progress.
vRealize Operations Manager vCenter collection
Back at the home page a prompt is displayed to set the currency; configurable under Administration, Management, Global Settings, Currency. In this case I’ve set GBP(£). For accurate cost comparisons and environment specific optimisations you can also add your own costs for things like hardware, software, facilities, and labour. Cost data can be customised under Administration, Configuration, Cost Settings.
vRealize Operations Manager quick start page
A common next step is to configure access using your corporate Identity Provider, such as Active Directory. Click Administration, Access, Authentication Sources, Add, and configure the relevant settings.
Multiple vCenter Servers can be managed from the vRealize Operations Manager interface. Individual vCenter Servers can also access vROps data from the vSphere client, from the Menu dropdown and vRealize Operations. A number of nested ESXi hosts are shut down in this environment which is generating the critical errors in the screenshot.
In this 2 part series we will walk through integrating Veeam with vRealize Automation and vRealize Orchestrator. Part 1 focused on giving users the ability to add virtual machines to existing Veeam backup jobs from within the vRA self-service portal. In Part 2 we will add the ability to restore virtual machines from a list of available restore points in vRA. The versions used are Veeam 9.5 and vRA 7.2 / 7.3.
The steps outlined below assume that you have already installed and configured Veeam Backup and Replication, and vRealize Automation with either embedded or external vRealize Orchestrator instance, as well as having a basic knowledge of both areas. The following process and the sample workflows we will import are not endorsed by, or supported by Veeam. Finally, Veeam Enterprise Manager is required to use Veeam RESTful API. For further reading material see the Veeam RESTful API Reference here. Alternative sample workflows and reading provided by The IT Hollow here, and another useful article by vRatpack here with vRA 6.2.
Add the REST Host
If you have already added your Veeam backup server as a REST host in part 1 then skip this step. Otherwise, open the vRealize Orchestrator client and log in as an administrator, change the view to Design from the drop down menu. The first thing we will do is add the Veeam server as a REST host. From the Workflows tab expand Library, HTTP-REST, Configuration.
Right click Add a REST host and click Start workflow. Enter the name and URL of the Veeam server, the default URL uses port 9399, for example http://VeeamServer:9399. Review the default options and click Next.
Configure the host authentication options as required. Here I have used Basic authentication, and entered the credentials for a service account with administrative access to Veeam.
Configure proxy and advanced settings if required, then click Submit. The workflow will run and add the Veeam server as a REST host. There are also Update a REST host, and Remove a REST host, workflows if you want to make any changes. Existing REST hosts can be viewed from the inventory tab under expand HTTP-REST.
Import the Sample Workflows
If you have already imported the sample workflows in part 1 then skip this step. In this example I am using sample workflows provided here, again these are not supported by Veeam. Download and extract the ZIP file to a location accessible from the vRO client. Change to the packages tab and click the Import Package icon. When prompted browse to the downloaded package file and click Import.
Ensure all the required elements are included and click Import selected elements.
We have now imported the backup workflow and action, and the restore workflow and action. The final element is a settings file which we will use to determine the REST host. Open the configurations tab and expand Library, Veeam. Click the Settings file and the pencil icon to edit. Select Attributes and locate the restHost attribute, click the Not set value and expand HTTP-REST, select the Veeam server we added earlier from the list of REST hosts and click Select. Click Save and close. The value of the restHost attribute should now be the Veeam backup server.
The restore jobs users select from are pulled using the getVMRestorePoints action under com.veeam.library in the actions tab. If you want to examine the workflow in more detail go to the workflows tab and expand Library, Veeam. Select the Restore VM workflow and go through the tabs in the right hand pane. From the General tab you can see the restHost attribute is using the settings configuration file we have just configured. The Inputs for the workflow are Date (the Veeam restore point) and vmObj (virtual machine name). Under the Schema tab you can view the Scripting task which is making the API calls.
Update Sample Script
If you are using the sample script referenced in this post then there are further steps required to fix the date formatting with later versions of Veeam. If you are using alternative or custom workflows then the following is not required.
Edit the Restore VM workflow, open the Schema tab and click the Find Restore Point script. Update the date and time format on line 25 to: var rpDateLocale = System.getDateFromFormat(restorePointNodes.item(i).getElementsByTagName(“CreationTimeUTC”).item(0).textContent,”yyyy-MM-dd’T’HH:mm:ss.sss’Z'”).toLocaleString();
Edit the getVMRestorePoints action, open the Scripting tab. Update the date and time format on line 26 to: var rpDateLocale = System.getDateFromFormat(restorePointNodes.item(i).getElementsByTagName(“CreationTimeUTC”).item(0).textContent + ” UTC”,”yyyy-MM-dd’T’HH:mm:ss.sss’Z’ ZZZ”).toLocaleString();
You can test the API calls are successfully bringing back restore points by running the workflow in vRO and selecting a virtual machine, a list of available restore points should be displayed.
vRA Integration
The final step is to hook the vRO workflow into vRA. Log into the vRealize Automation portal as a user with service architect permissions. From the Design tab select XaaS and Resource Actions. Any existing resource actions are listed. Click New.
Map the resource action to the relevant vRO workflow. In this case we need to expand Library, Veeam and select the Restore VM workflow. Click Next.
The input mappings should already be populated; the resource type is IaaS VC Virtual Machine, the input parameter matches up with the parameter configured in the vRO workflow (vmObj which passes the virtual machine name), and this maps to the VC:VirtualMachine orchestrator type.
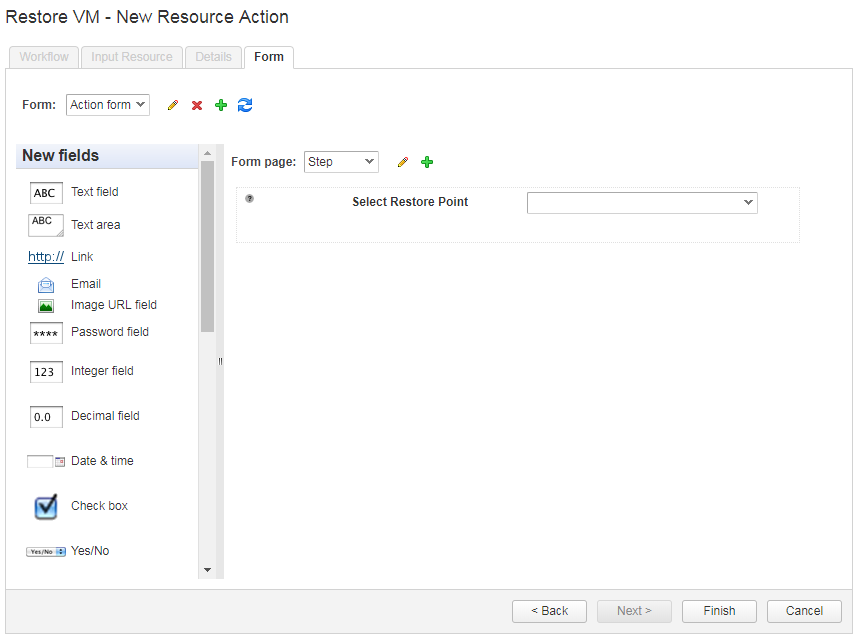
Accept the default values for the resource action form and click Finish.
The new resource action is now listed as a draft. To start using the action select it and click Publish.
Now select the Administration tab and Catalog Management. Open the Actions page, the new resource action we created should now be displayed.
If you want to change the icon of the resource action you can do so by selection the action and clicking Configure. There are a number of useful vRA icons available here, including sample icons for day 2 actions. Note for users of vRA 7.2 there is a known issue with changing the icon for custom actions, resolved in 7.3 as per this KB article.
The next step is to assign our custom action to an entitlement. Open the Entitlements page and select the relevant entitlement. Click the Items & Approvals tab, under Entitled Actions click the green plus symbol. Locate the new resource action and select the check box to add it to the entitled actions. Click Ok and Finish.
To confirm the configuration has worked browse to the Items tab and select Machines. Any virtual machines that have the custom resource action added to the entitlement will show the new action in the drop-down Actions menu.
When selecting the new action I am presented with the action form as per the design canvas we saw earlier. In this example I select the restore point from the drop-down list that the getVMRestorePoints vRO action has pulled from the Veeam backup server, and click Submit.
The virtual machine name is then passed through to the next stage of the workflow, along with the restore point ID. You can check the status of the job in vRA under the Requests tab, check the Restore VM workflow has run successfully in the vRO console, and check the restore task that will be running as normal in the Veeam Backup & Replication console.